
![]() NEWS 190705 about Raspberry Pi Debian 10 Pixel – 32bit – an Exton Build
NEWS 190705 about Raspberry Pi Debian 10 Pixel – 32bit – an Exton Build
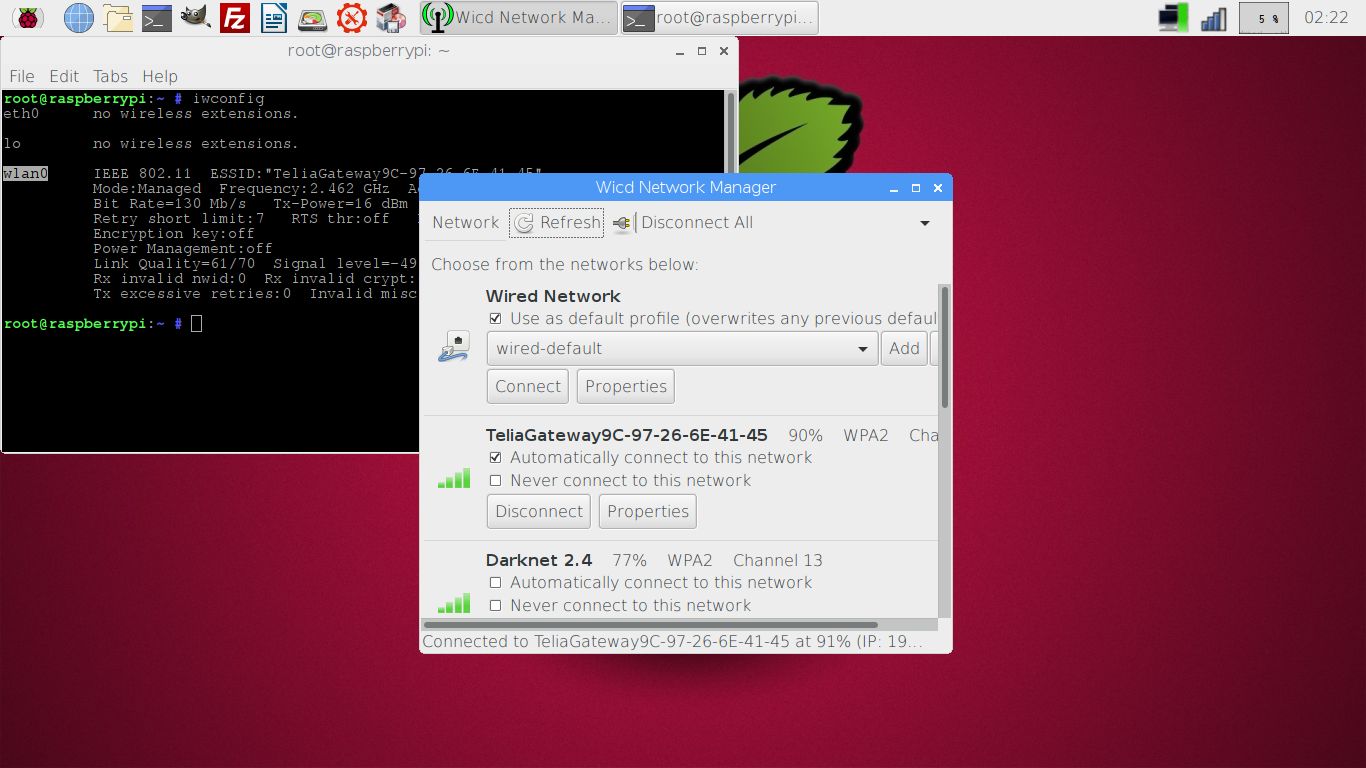
My previous Debian Pixel Build from is from 180928 . Study all included packages in Build 190705- latest by 190705. I’ve added NetworkManager and also Wicd, which makes it easier to configure wireless connections. Choose the one which works for you.
NEWS 180928 – a YouTube video about Debian Pixel
I’ve discovered a YouTube video about my Debian Pixel Build 170425. The video is called Debian Pixel..Exton forks it for you..
This video is of course also valid for Build 190705 and 180928. By watching the video you can learn a lot about Debian Pixel’s features.
Most important changes in Build 190705
This build replaces version 161223 , 170425, 180316 and 180928 . I’ve upgraded Raspbian/Debian from Stretch to Buster – Debian 10 stable to be officially released tomorrow (190706). I’ve also upgraded the kernel from 4.9.0-9-686-pae to 4.19.0-5-686-pae. I’ve also included kernel 4.19.0-5-686, which shall be used on older computers. PAE (Physical Address Extension) increases the physical memory addressable by the system from 4 GB to 64 GB. Firefox have been installed so you’ll have a browser when logged in as root. You can’t run Chromium as root. Another good thing about Firefox is that you can use it to watch Netflix movies.
OLD NEWS FROM 161223
On December 22, 2016 I read that the Raspberry Pi Foundation had announced the release of a new PIXEL image that can be booted on a PC or Mac. Study this site. I saw immediately that there was no installer included, which I thought was a little disappointing. Come to think of Refracta tools, which work very well in Debian and Ubuntu. I quickly made a “remix” of the Raspberry Pi Foundation PIXEL image. My remix thus include Refracta tools. This means that you can easily install the system to hard drive and you can just as easily make your own remix of the Raspberry Pi Foundation PIXEL image. I’ve added a few packages. Most important Synaptic, which I find essential.
About the PIXEL Desktop
Raspbian had its biggest update ever in September, 2016, thanks to a dazzling new desktop environment called PIXEL. Raspbian with PIXEL (which stands for “Pi Improved Xwindow Environment, Lightweight”) is a huge software update to the desktop environment. It introduces a crisp new interface, and is brimming with new programs and features.
VirtualBox and VMware
My build/image works very well in VirtualBox and VMware. I.e. you can run the system directly from the ISO file and also install it to a virtual hard drive. You can of course also make your own Raspbian/Debian system with the the PIXEL Desktop using Refracta Snapshot (pre-installed).
KERNEL
Kernel 4.19.0-5-686-pae is used in Build 190705. PAE (Physical Address Extension) increases the physical memory addressable by the system from 4 GB to 64 GB. If you want to run the system (which is 32bit) on older computers you shall use kernel 4.19.0-5-686, which also is included.
Login and passwords
Log in to the PIXEL Desktop as the ordinary user pi or as root. The passwords are raspberrypi respectively root. When logged in as pi you can use Sudo to become root. (Command: sudo su). When running Debian Pixel live (from a DVD or a USB stick) you’ll end up (after the boot process) logged in automatically as the user pi in X (PIXEL Desktop).
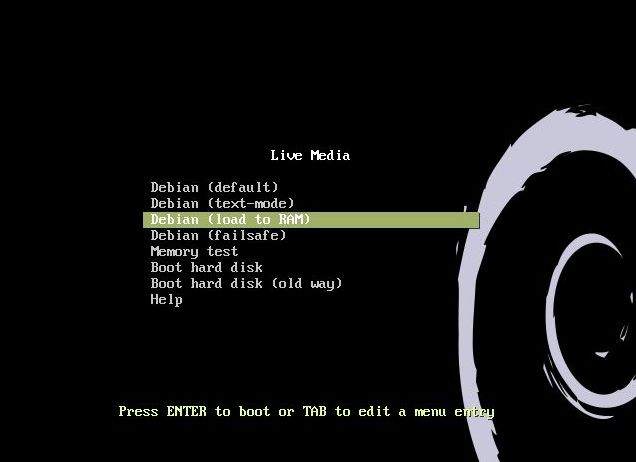
Runs from RAM
Another great thing is that this build can run from RAM. Use Boot alternative 3 (load to RAM). When the system has booted up you can remove the disc (DVD) or the USB stick. You’ll need at least 4 GB RAM to run the system that way. I.e. super fast!
Spotify
You may want to run Spotify. In this version of Debian Pixel you can’t install Spotify with the command sudo apt install spotify-client. Too many unfulfilled dependencies. You can, however, run Spotify Web Player. Use Firefox for that. Watch a screenshot when Spotify Web Player is running.
Important about Refracta
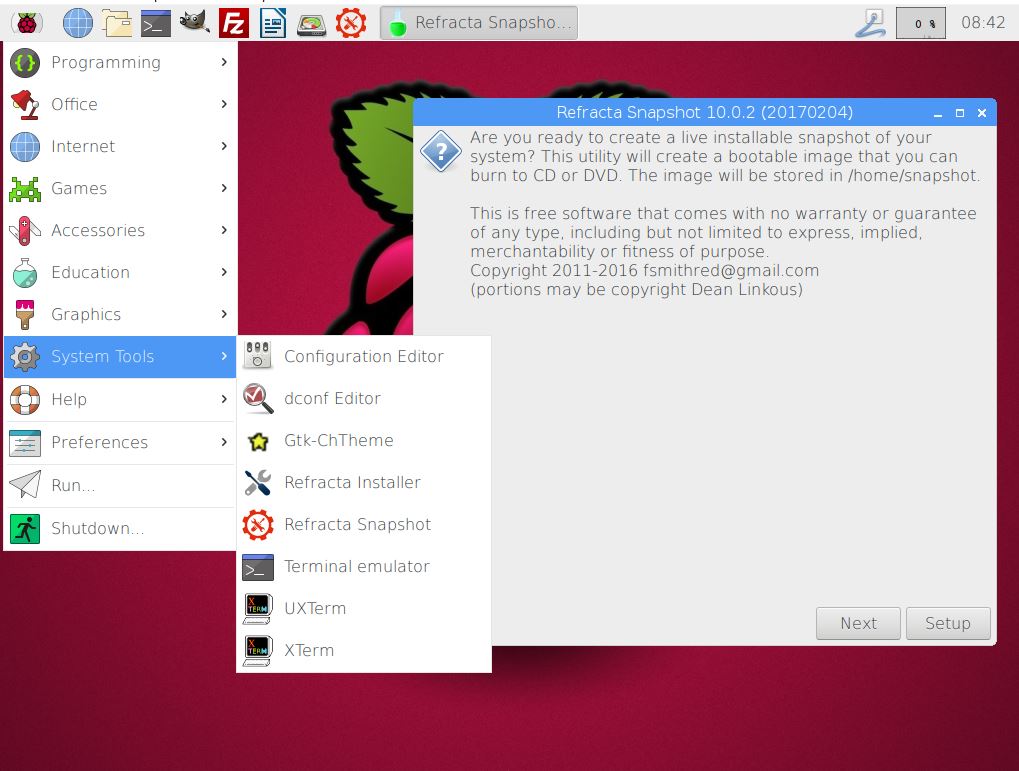
You can use the Refracta tools (pre-installed) to create your own installable Raspberry Pi Debian 10 PIXEL system once you have installed my build to hard drive. I mean change everything and then create a whole new Debian live system. Start Refracta from Menu >> System tools >> Refracta snapshot. You don’t even have to install my build to hard drive before you can use the Refracta tools. If you have plenty of RAM you can create a new (your own!) Debian PIXEL system while running my build from DVD or a USB stick. Please note that the whole Refracta process (creating your new ISO file) will only take 20 – 60 min! Please edit the configuration file /etc/refractasnapshot.conf first. Change line 45 and 46. I.e. decide where you want the ISO file to be build. The whole thing is very simple. NOTE: You can also do everything in VirtualBox or VMware. Use FileZilla (pre-installed) to transfer your new ISO file to your server.
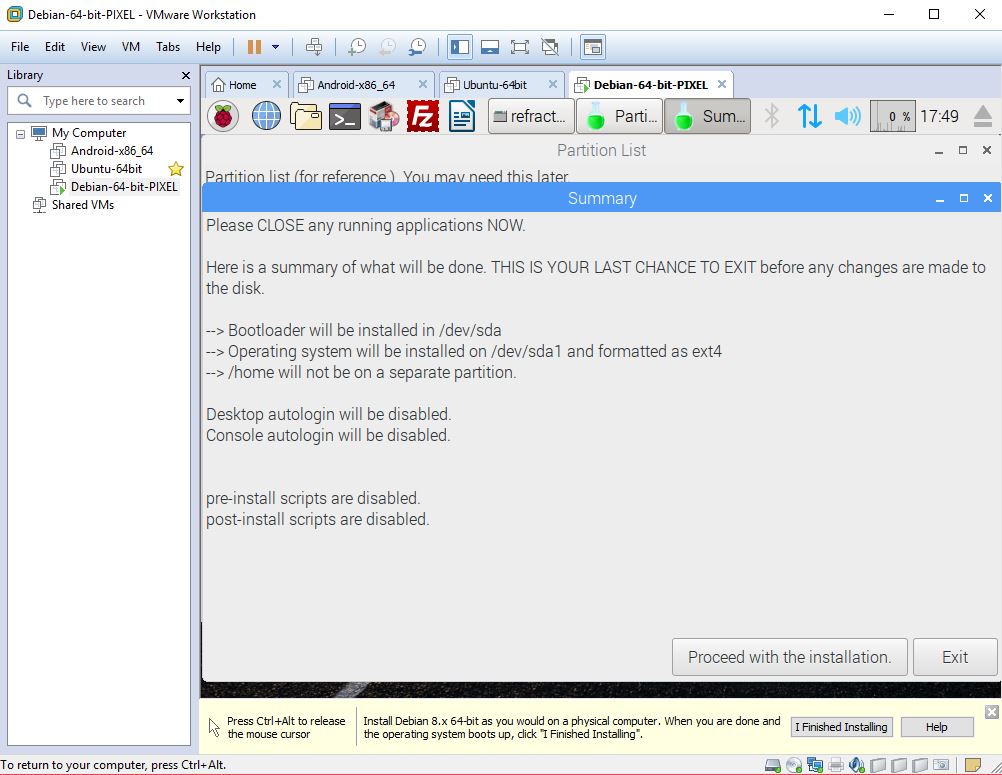
Install to Debian PIXEL hard drive
Just start Refracta Installer from Menu >> System tools >> Refracta Installer and follow the instructions. Very simple.
Install Debian PIXEL to a USB stick
You can use Rufus in Windows. Persistence can’t be enabled though. You can also use UNetbootin in Windows or Linux. The best way to do it is to burn Debian PIXEL to a DVD, start up the system from the DVD and then use Refracta Installer for the installation. Choose to install Grub in MBR on /dev/sdb. (Normally your USB stick, but check it carefully!) I.e. you will get a chance to choose between /dev/sda and /dev/sdb. This method will (of course) give you perfect persistence.
Watch the slideshow below showing the Refracta installation process in Debian PIXEL.
SCREENSHOTS
Screenshot 1 – Spotify running
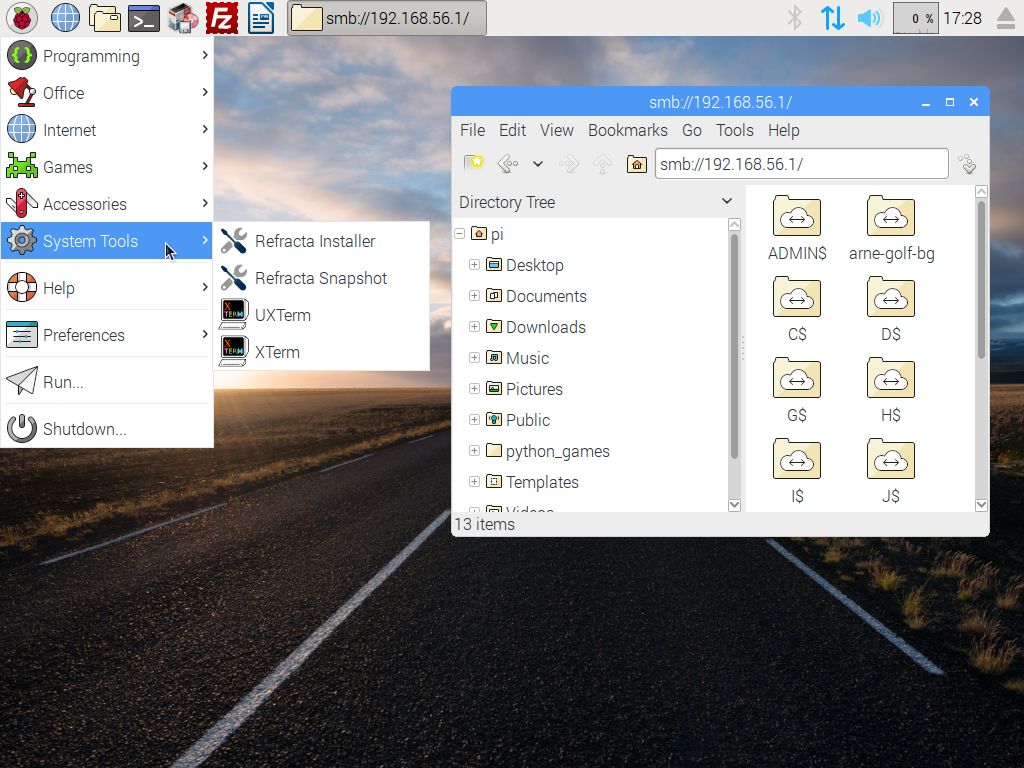
Screenshot 2 – Samba running (reach your Windows computers in your network)
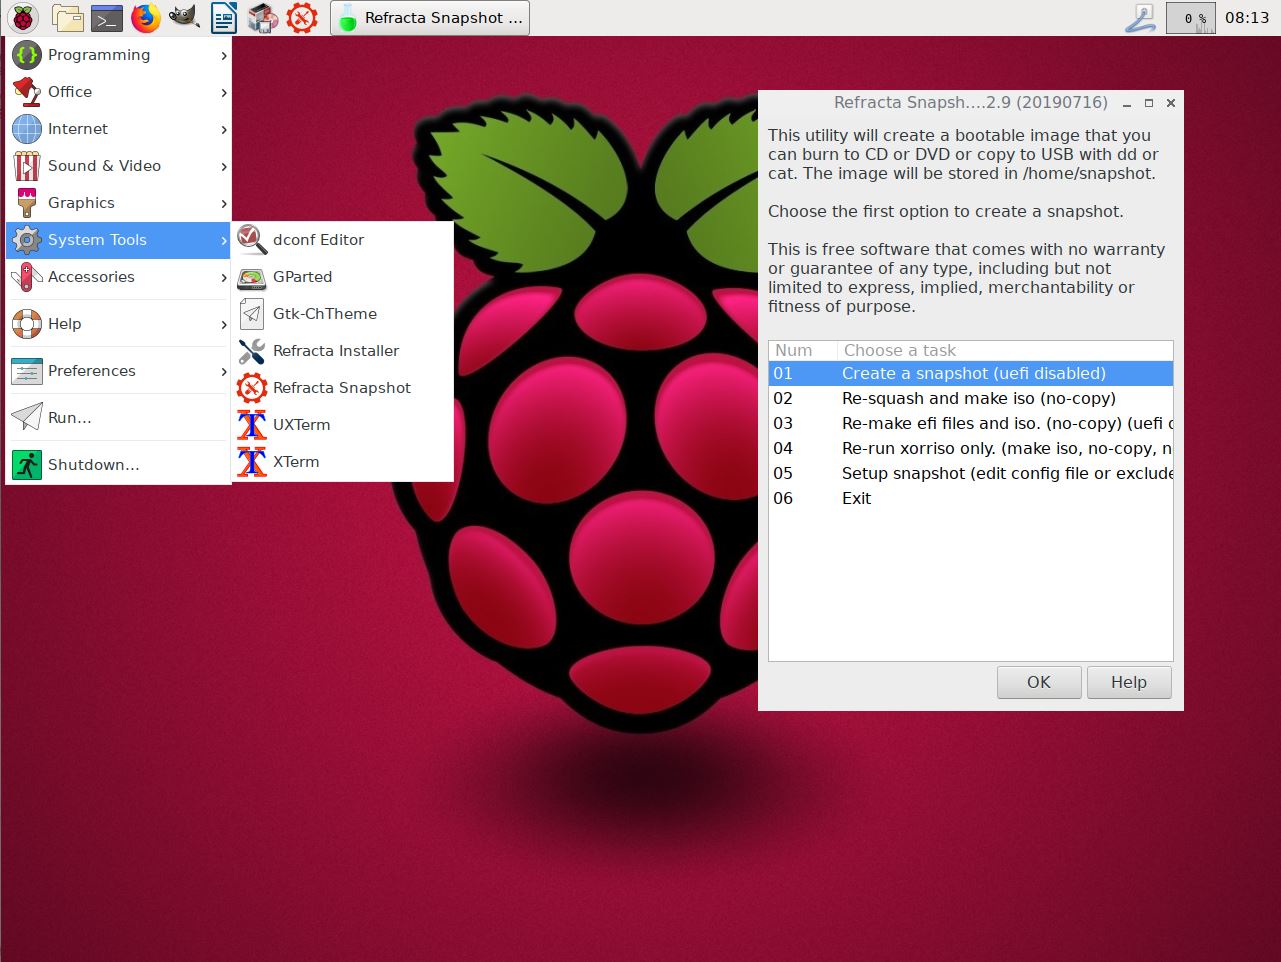
Screenshot 3 – Refracta Snapshot has started
Screenshot 4 – Refracta Installer has started in VMware
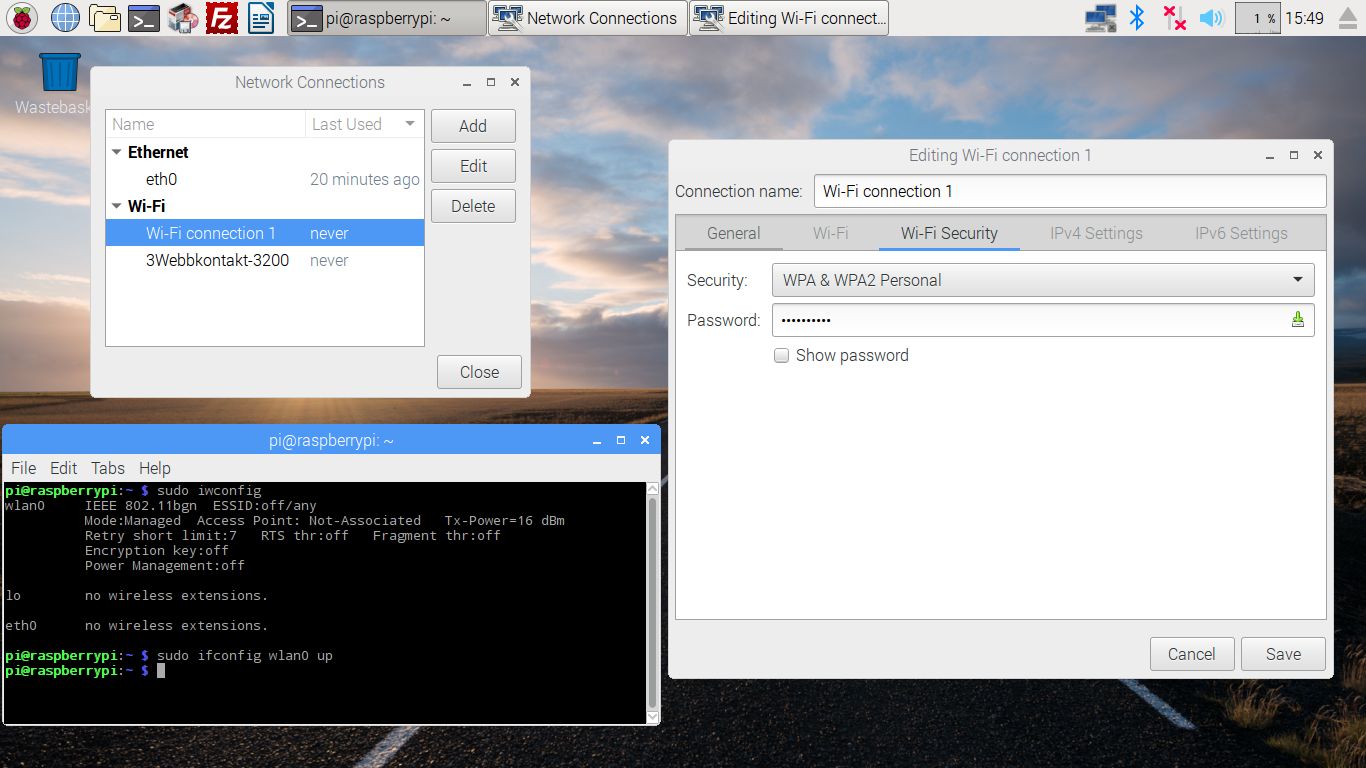
Screenshot 5 – Wireless connection with NetworkManager and Wicd (installed in Build 170425, 180316, 180928 and 190705)
Screenshot 6 – WiFi connection using NetworkManager – in detail
DOWNLOAD
This version has been replaced by Build 191102...
Raspberry Pi is a trademark of Raspberry Pi Foundation
andex.exton.net – latest is AndEX Pie 9.0 (with GAPPS) and AndEX Oreo 8.1 (also with GAPPS)!
and
about my Pie, Oreo, Nougat, Marshmallow and Lollipop versions for Raspberry Pi 3/2 at
raspex.exton.se – latest is RaspAnd Pie 9.0 (without GAPPS) and RaspAnd Oreo 8.1 (with GAPPS)!
Hello Exton
I have tryed to install but I actually still don´t know exactly how to connect the internet on it, does it require a special command to configure wired and the ssids from the wi-fi routers available?
thank you!
Use Wicd. Check your interfaces with the command iwconfig. Change Wicd’s preferences accordingly. Refresh and connect!
Thank you Mr.Exton!
you Rock dude!
truly 😀
Use wicd – does this mean change the false settings to true?
I have the same issue as this thread with wifi and ethernet connections are greyed out.
Also, the onboard wifi card isn’t detected but a USB wifi adapter works just fine?
Apologies, I am a relative newbie and just wrestling with your excellent work creating a live install of Raspbian Pixel.
I would be more than happy to contribute to keep this project going and developing.
Much apprecaited – mike-six3
Try with NetworkManager instead. Should be easier.
Maybe you are using an old (too old) version? Link to the latest version: https://www.exton.se/?p=2874
Hey Mr.Exton
I have another doubt regarding the refract installer
i have made an iso image
and now i have tryed to you know use the refracta installer but all the time every time i try with a lot of different hds, usb drives and even memory cards it always says that something is wrong
maybe you checked more than one box
you should want to install the system to (null)/dev/sda1
but never isntalls man
I am already loosing it because its been more than three days trying to install it but NADA bro
something is deeply wrong or I am doing something wrong which i dunno man cause I am following your instructions!
sorry for the bad english….. maybe I have to unmount the pendrive… also I will follow a certain tutorial from you too cause I want to make it persistence because I can´t uninstall the windows on the notebook hdd.
so I got one those DT50 32gb to try to make it persistence there.
sorry I am not loosing it hehehe I just got into a peak but there are other mountains to climb.
I will wait your instructions, thank you very much btw Mr. Exton!
As I write on the INFO site: The best way to do it is to burn Debian PIXEL to a DVD, start up the system from the DVD and then use Refracta Installer for the installation. Choose to install Grub in MBR on /dev/sdb. (Normally your USB stick, but check it carefully!) I.e. you will get a chance to choose between /dev/sda and /dev/sdb. This method will (of course) give you perfect persistence.
Thanks for the write up on installing on Virtualbox. I am having trouble installing with Refracta (and this happens on another PC trying a direct install to disk). I step through Refracta install, use Gparted, create partition table under “device”, create single primary partition, exit gparted, next step “install grub bootloader” select MBR, select /dev/sda then get error “Something is wrong. (null)/dev/sda is not a block device”. I have tried looking for a solution with Google but no luck so far.
Any ideas how to resolve this?
Cheers
Sorry forgot to mention I am using the ~exton-build-2130mb-190705.iso mounted as a “Live CD/DVD” in virtualbox.
Andy,
I did check the install function again in VirtualBox. I got the same errors as you. The errors will go away if you install a new version of Refracta Installer base and Refracta Installer Gui. I.e. version 9.5.3. Go to https://sourceforge.net/projects/refracta/files/tools/ and download the deb packages. Install with sudo dpkg -i refracta-installer.deb refracta-installer-gui.deb. (Insert the correct file names of course).
Same challenge as Andy. Attempting to install to PNY 120GB SSD in HP ze 4427wm, w/ Athlon-XP-M proc & 1GB RAM. REALLY looking forward to this installed on my HP – THANKS for all the work!
1) Burned “…exton-build-2130mb-190705.iso” to DVD (HP won’t boot from USB).
2) Live session loads, click to start Refracta Installer (both upper toolbar, and thru left menu, same results). “Admin Mode”, choose “use sudo”.
3) “Refracta Installer” window “This utility will install…”, click Continue. No changes to default options, click OK.
4) “Partitioning”, as I had already prepared my partition, click “skip this step”.
5) “Install GRUB bootloader”, click “MBR”. “Choose a location…”, only option to choose is /dev/sda, click that, then click OK.
6) Report window “Error”, “Something is wrong. (null)/dev/sda is not a block device.”, either “Exit” or “Go back”, click “Go back”.
7) “Install GRUB…”, this time select “No bootloader”, figuring that could be installed after OS is working on drive.
8) Background terminal YAD box gives a readout, quickly overlain with “Partition List” window, which shows
“/dev/sda1:…”
“/dev/sda2:…”
“/dev/sda3:…” – (/dev/sda3 is my prepared partition for PIXEL)
“/dev/sda4:…”
“/dev/sr0:…” (DVD drive), &
“/dev/loop:…”
9) This is overlain with a small window “Choose a partition…”, and gives me the 4 /dev/sda options. I click /dev/sda3, then OK
10) Report window “Error”, “Something is wrong. Maybe you checked more than one box. You said you want to install the system to (null)/dev/sda3”. Two options “Go back”, or “Exit”. “Exit” kills the installer completely, no install. “Go back” returns me to step 8, over & over.
Yes, this HP is VERY old, and might be missing some instruction sets for the processor. However, terminal “lsblk” & “fdisk -l” commands show all partitions for /dev/sda, and /dev/sr0, & /dev/loop. The hardware is recognized at terminal level, but not thru the Refracta Installer. Any tips to try? Any workarounds? Any updates to the build? Again, Thanks for all the work!
I don’t know why these errors occur, but you could always do a manual install. That is if you already have one Linux system installed on your computer and already use Grub as boot loader. Do it like this:
1) Extract the ISO file
2) Find live/filesystem.squashfs
3) Command: unsquashfs filesystem.squashfs
4) Command: mount /dev/sda3 /mnt/sda3 (your install partition)
5) Command: cp -av root-squashfs/* /mnt/sda3
6) Fix boot lines for Debian Pixel in /boot/grub/grub.cfg on the partition where you have Grub installed
2nd reply:
Paul F.,
I did check the install function again in VirtualBox. I got the same errors as you. The errors will go away if you install a new version of Refracta Installer base and Refracta Installer Gui. I.e. version 9.5.3. Go to https://sourceforge.net/projects/refracta/files/tools/ and download the deb packages. Install with sudo dpkg -i refracta-installer.deb refracta-installer-gui.deb. (Insert the correct file names of course).
Just came across this (maybe a year late) and installed Pixel on an old eMachine ER1402. The wired connection worked fine but I could not get the wifi to work using Network Manager utility. Did a bit of research and others have advised to: “apt purge openresolv dhcpcd5”, they are seemingly not compatible with NM.
Package ‘openresolv’ is not installed, so not removed
The following packages will be REMOVED:
dhcpcd5* raspberrypi-net-mods*
After the above NM was able to see and config the wifi. Rebooted machine and the wifi started fine using the saved settings. Not sure if this change will affect anything else.
Thanks for letting us know your solution.