
How to burn an ISO file (for example mex-64bit-cinnamon-4.0-refracta-efi-1020mb-190601.iso) and something about md5sum
Read first “How to successfully burn an ISO-image“. That site describes ways to burn iso files with different burning software, including the most common Nero Burning Rom. Most important is to remember that the iso file must be burned as a so-called IMAGE.
Easiest
If possible, it is even easier if you use the free program ImgBurn. When you insert a blank CD/DVD into your CD drive, you will immediately be asked if you want to burn an IMAGE. When you answered yes and selected the current ISO file to burn ImgBurn starts burning instantly. No special settings are needed.
Options in Linux
You can of course also use the excellent Linux programs K3b or Brasero for burning. They are as easy to use as ImgBurn.
Check with md5sum
Before you burn your downloaded ISO file, make sure that it is error-free. You do this with the method md5sum. Read about this here. The program you need is called md5sum.exe. It can be downloaded directly here. You shall place md5sum.exe in C:\Windows\System32 before you can use the program. Using Windows 10 it has md5sum “built in”. Just go to the folder where you have the ISO-file and the md5sum-file. Open a new CMD window from the Start Menu. Navigate to the directory wherever the files are. I.e. the ISO-file and the md5sum-file. Run the following command (example):
CertUtil -hashfile mex-64bit-cinnamon-4.0-refracta-efi-1020mb-190601.iso MD5
The answer will be:
MD5 hash of mex-64bit-cinnamon-4.0-refracta-efi-1020mb-190601.iso:
134a06c52586a58186c65b1518a92e40
CertUtil: -hashfile command completed successfully
The basic premise
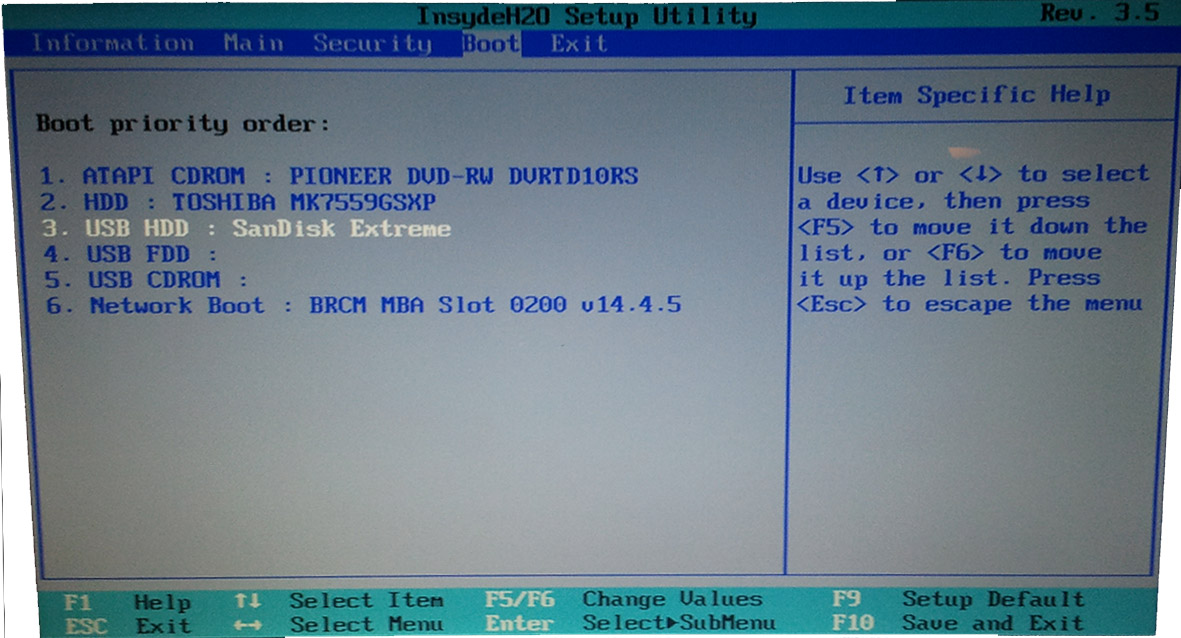
I should finally mention the following “obvious” things: A basic requirement for your burned disc to work is that you set the BIOS so that the computer can boot from the CD drive. This is done differently in different computers. The most common is to press the F2 or F9 key during start-up of the computer. That is, right away when you see the boot image coming up. So it looks like this on one of my computers when I’m inside the BIOS to change the boot order. If I want the computer in the first place to boot from my USB stick SanDisk Extreme I move it into position 1 by pressing F6. Then, I press F10 to save my changes to the BIOS. After that the computer restarts.

![]()
Post last edited 190601
I am now loading your main page to check out all your stuff. I was first attracted by ExLight, and now that I’ve seen some more of your stuff I will be a fan a long time. Even though I am having a small problem installing ExLight, for some reason when I click the Install Now button from the Live desktop, I get a blank error message that the installer quit. That’s it, just that it quit, any ideas?
I am trying to install to partition E:, which is located on a USB external HDD, which my computer considers a permanent HDD. I have used 3 different programs to put the .iso on a thumb drive all with the same result. Every time the live version loads and runs great, but as soon as I click the install icon, the install immediately fails, with no error, just error box that has all the boxes filled with the word “Null” or an empty box.
I was attracted to your work because I wanted a distro that had more than one desktop option, while maintaining a pure desktop environment. All of the distro’s Iooked at that had multiple DE’s, that all are installed on top of each other, you open Gnome, and use KDE applications. I wanted something that didn’t combine DE’s, but stayed true to their original spirit. I also wanted to get away from the same distro everyone is using, Ubuntu is so big, and so generic, I wanted something with a soul, and I have found that in your work, I’m not letting a few problems deter me.
I should have said I have been running Ubuntu/Kubuntu, and Zorin from this drive at the same time for the last year and a half, so I know it’s possible to run from it.
You shouldn’t have any problems to install ExLight. Log in as root. Open up a terminal and start the installation program with the command ubiquity. Any errror messages?
Be sure to follow my advice on the info page. I.e.:
INSTALLATION to hard drive
Note that you in advance (just in case) should create a partition of at least 6 GB for ExLight and a SWAP space double the size of your computer’s RAM. I.e. if you have RAM of 1024 MB or less. If you have RAM of 2 GB or more it’s enough with a SWAP space of 2 GB. The installation program in ExLight/Ubuntu is otherwise “intuitive”. Choose manual partitioning and select the partition you created in advance for installation.
As a long standing Slackware user, I usually use ‘dd’ to do my iso to dvd burning. Not just because its my initials, but because is has a simple interface that allows me to use ‘kill’ for something other than stopping programmes.
You should run isohybrid (part of syslinux) on the ISO before you publish it. I had to do that before I could boot the ISO loaded onto a USB flash drive (copied with dd).
Yes, that’s true. I forget that sometimes. Which ISO?
I can’t isohybrid the latest ExGent ISO properly: isohybrid: exgent-64bit-xfce4-2280mb-160123.iso: boot loader does not have an isolinux.bin hybrid signature. Note that isolinux-debug.bin does not support hybrid booting
Ok, but try to run the command isohybrid exgent-64bit-xfce4-2280mb-160123.iso first or use the dd-command. I.e. dd if=exgent-64bit-xfce4-2280mb-160123.iso of=/dev/sdX bs=512k status=progress && sync
Or better yet: Follow my USB install instructions at http://exgent.exton.net/install-usb-grub/